Pack Stage:
In the Pack Stage, PkgCreate.py packs all the necessary files according to your metadata and creates a .spk at /toolkit/result_spk. If you want PkgCreate.py to enter the Pack Stage without the Build Stage, simply run PkgCreate.py with the-i option.
cd /toolkit
pkgscripts-ng/PkgCreate.py -i ${project}
/toolkit/
├── build_env/
│   └── ds.${platform}-${version}/
├── pkgscripts-ng/
│   ├── EnvDeploy
│   └── PkgCreate.py
└── source/
    └──${project}/
        └── SynoBuildConf/
            ├── depends
            ├── build
            └── install
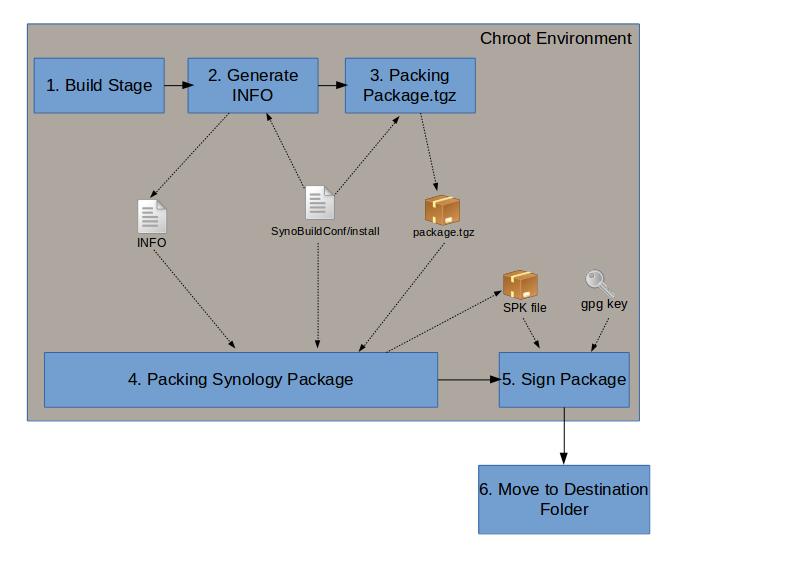
Pack Stage Work Flow:
PkgCreate.pywill execute the build scriptSynoBuildConf/install.- Create
INFOfile by usingINFO.sh. - Move necessary files to a temporary folder,
/tmp/_install, for instance, and createpackage.tgz. - Move necessary metadata and resources to the temporary folder,
/tmp/_pkg, for instance, and create the.spkfile.
- Create
PkgCreate.pywill sign the newly created.spkfile with a gpg key which is placed under/root/(the package signing mechanism is deprecated after DSM7.0).
SynoBuildConf/install
This file must be written in bash and indicates on how to pack your project. The current working directory is /source/${project} under chroot environment. If this is the top project of your package, this file will define how to create the .spk file, including directory structure and the INFO file.
#!/bin/bash
### Use PKG_DIR as working directory.
PKG_DIR=/tmp/_test_spk
rm -rf $PKG_DIR
mkdir -p $PKG_DIR

### get spk packing functions
source /pkgscripts-ng/include/pkg_util.sh

create_inner_tarball() {
    local inner_tarball_dir=/tmp/_inner_tarball

    ### clear destination directory
    rm -rf $inner_tarball_dir && mkdir -p $inner_tarball_dir

    ### install needed file into PKG_DIR
    make install DESTDIR="$inner_tarball_dir"

    ### create package.txz: $1=source_dir, $2=dest_dir
    pkg_make_package $inner_tarball_dir "${PKG_DIR}"
}

create_spk(){
    local scripts_dir=$PKG_DIR/scripts

    ### Copy Package Center scripts to PKG_DIR
    mkdir -p $scripts_dir
    cp -av scripts/* $scripts_dir

    ### Copy package icon
    cp -av PACKAGE_ICON*.PNG $PKG_DIR

    ### Generate INFO file
    ./INFO.sh > INFO
    cp INFO $PKG_DIR/INFO

    ### Create the final spk.
    # pkg_make_spk <source path> <dest path> <spk file name>
    # Please put the result spk into /image/packages
    # spk name functions: pkg_get_spk_name pkg_get_spk_unified_name pkg_get_spk_family_name
    mkdir -p /image/packages
    pkg_make_spk ${PKG_DIR} "/image/packages" $(pkg_get_spk_family_name)
}

create_inner_tarball
create_spk
At the beginning, the script called the PrepareDirs function which will prepare the necessary folder for the project.
After created the folder, the script called SetupPackageFiles to move necessary resource files to $INST_DIR and $PKG_DIR. In this step, we called the INFO.sh file to create the INFO file. Although you may put the codes that generate the INFO file in the SynoBuildConf/install script, we highly recommend that you create the INFO seperately. Generally, we name it INFO.sh. You can see how to write INFO.sh in the following subsections.
After moving the resource file to the proper location, we called the MakePackage function to create the package. We included/sourced a script called pkg_util.sh which is located at /pkgscripts-ng/include. The pkg_make_package and pkg_make_spk defined in pkg_util.sh can help to create package.tgz and .spk.
pkg_make_package $1 $2: Create packages.tgz of $2 from files in $1.pkg_make_spk $1 $2: Create spk of $2 from files in $1.
INFO.sh
As mentioned earlier, INFO.sh is just an optional script. You can create the INFO file by hand or move the code to SynoBuildConf/install. However, we strongly recommend that you utilize INFO.sh so that you can create the INFO file separately from SynoBuildConf/install.
#!/bin/bash

source /pkgscripts-ng/include/pkg_util.sh

package="ExamplePkg"
version="1.0.0000"
displayname="Example Package"
maintainer="Synology Inc."
arch="$(pkg_get_unified_platform)"
description="this is a Example package"
[ "$(caller)" != "0 NULL" ] && return 0
pkg_dump_info
The above code is just an example to show some important variables for
pkg_dump_info. If you want to know more details about theINFOfile and each fields, please refer to INFO.
Similar to SynoBuildConf/install, we must first include pkg_util.sh. After that, we can set up proper variables and call the pkg_dump_info to create the INFO file correctly. As you may have noticed, we used another helper function called pkg_get_platform to set the architecture variable. This variable indicates the current platform we are building.
- pkg_get_spk_platform: Return platform for “arch” in
INFO. - pkg_dump_info: Dump
INFOaccording to given variables.
Remember to make
INFO.shbe executable (e.g.,chmod +x INFO.sh)
Spk Packing Functions
Synology package framework provides several functions to improve efficiency of packing packages. The functions such as generating architecture information in the INFO file, separating .spk name and creating .spk will be enabled after import /pkgscripts-ng/include/pkg_util.sh.
Spk Platform Functions
A .spk can be installed on one or more platforms. You can decide which platform can be installd via INFO file.
| function name | Values | Description |
|---|---|---|
| (No function) | noarch | Package only contain scripts. spk can be run on all synology Models. |
| pkg_get_platform_family | x86_64 i686 armv7 armv5 ppc... | Unify platforms with same kernel into a platform family. The package can run on same family of synology models. |
| pkg_get_spk_platform | bromolow cedarview qoriq armadaxp... | Directly output the platform where the toolkit environment is used. The package can only run on the specific platform. |
- If your package doesn't have any native binary, you can use
noarchas the platfrom and write the scripts for your package. Package witharch=noarchcan be installed onto any synology model. - If your package doesn’t have any kernel related functions, the package can run on the same architecture platforms. Use function
pkg_get_platform_familyto get platform family. Package can be installed on the models included in the same platform family. For example, package witharch=x86_64can be install ontobromolow cedarview broadwellmodels. - If your package contains kernel related functions, every platforms will need a specific spk. Please use function
pkg_get_spk_platformto get the platform(s) which is compatiable with your environment.
Spk Naming Functions
After spk generated, we need to distinguish spk name by platform. We can use spk name functions:
| Function name | Corresponding platform function | Example | Description |
|---|---|---|---|
| pkg_get_spk_name | pkg_get_spk_platform | examplePkg-bromolow-1.0.0000.spk / examplePkg-cedarview-1.0.0000.spk ... | Spk name depends on which toolkit environment is using. |
| pkg_get_spk_name | noarch | examplePkg-1.0.0000.spk | If the package has platform="noarch", this function will output spk name without platform info. |
| pkg_get_spk_family_name | pkg_get_platform_family | examplePkg-x86_64-1.0.0000.spk | Spk name will be unified into platform family. Same platform family will geneate the same spk name. i.e bromolow and x64 will have same spk name. |
You need to use path of
INFOas argument. If no path specified, the function will getINFOfile from$PKG_DIR/INFOautomatically.
Spk Creation Functions
Developer can use pkg_make_spk to create spk.
pkg_make_spk $source_path $dest_path $spk_name
- source_path is spk source directory. All spk files must copy into this direcotry before run pkg_make_spk.
- dest_path is target spk path.
- spk_name is spk name with/without platform info.
Example:
pkg_make_spk /tmp/_test_spk "/image/packages" $(pkg_get_spk_family_name)